Patriotic Fruit

Patriotic Fruit

As hot summer days begin to stretch out before us, there’s nothing quite like the taste of watermelon. It’s cool, crisp and refreshingly sweet. The best part about it is that it’s even got a healthy boost of vitamins and fiber. It’s a great snack for kids to munch on, especially when there are seeds to spit! This Fourth of July, try making this patriotic fruit platter that is not only festive but nutritious and delicious as well.

This no-cook recipe is great for any age, but for kindergartens who are working on developing their fine motor skills, this is an especially fun project. To make your watermelon-blueberry platter, your child will use cookie cutters and kabobs, and she’ll practice the “pincer grip” that will help her later with handwriting. This is a recipe that friends and family will definitely enjoy!

What You Need:

  • 1 seedless Watermelon
  • 1–2 cartons of blueberries (amount depends on the size of your watermelon!)
  • 5-point star cookie cutter, about 1 ½ inches to 2 inches across (or one of each size, if you have a couple!)
  • Package of 7–8-inch bamboo barbecue skewers (50-75)
  • Bunch of fresh mint leaves

What You Do:

  1. Before you begin, make sure you have washed your fruit thoroughly, including the outside of the watermelon. For this dish, you will be using the rind as well as the flesh of the melon, and you’ll need to make sure that everything is clean!
  2. Use a sharp knife to cut the watermelon exactly in half, making two bowl shapes of watermelon. Then place one half on a table, so that the flesh is facing up, and use the knife to dig around the edge of the flesh, and separate it from the rind. Try to remove the flesh in one big chunk—or as big a chunk as possible!
  3. Then slice the watermelon flesh into large circles, each about ¾ of an inch thick.
  4. You will be left with one half of the watermelon with the flesh and rind intact together, the watermelon slices, and one round bowl of rind. Turn the rind over so that it makes a dome, and place it on a platter lined with fresh mint. Put it aside—you’ll be using it soon.
  5. The remaining half of your melon will be cut up as well, but this one will be a little easier, because you don’t need to keep the rind “dome” intact. For the second half, cut your watermelon into circles, rind attached. Each circle should be about ¾ of an inch thick (for this recipe, it’s better to make them thicker, not thinner if you’re unsure of the size). Then use a sharp knife to cut off the rinds, leaving a circle of juicy red watermelon intact.
  6. Now’s the time for your child to get in on the action! Lay all of the watermelon circles on a clean cutting surface and invite your child to use the cookie cutter to cut the flesh into star shapes. For your young learner, this is a great time to point out some early lessons in spatial thinking: many star cutters can “tessellate,” i.e. their points can be lined up side by side to make a repeating pattern—which will minimize your watermelon waste. See how many complete stars your child can make from one watermelon circle.
  7. You can expect to end up with some scraps, so feel free to munch on these along the way. When you and your child are done, you’ll have a lovely array of bright pink watermelon stars.
  8. Take out your skewers and have some fun! Help your child run a skewer through each star (through the length of the star rather than the width), leaving at least a half an inch at the top for people to grab. Make sure the pointed end of the skewer ends up on the bottom. Use the pointed end to poke the hole in the watermelon.
  9. Keep going to create a ton of watermelon star skewers! You can put as many watermelon stars as you would like on one skewer, depending on the size of each skewer and the size of your stars, but 3 or 4 should be the maximum amount for one any skewer.
  10. Help your child stick the watermelon skewers into the melon dome on your platter. You and your child can arrange them in whatever design you like.
  11. On separate skewers, have your child stick 5–6 blueberries on a skewer, again with half an inch sticking out on top, and place these blueberry skewers into your watermelon dome in the spaces between your watermelon stars. (For added color, if the fruit is available in your area, you can also try alternating blueberries with red raspberries or cherries!)
  12. When you and your child are done, you’ll have a simple, yet festive platter of delicious and healthy summer treats to serve at your next Fourth of July party. It’s sure to be a real crowd pleaser!


patriotic-fruit-slideshowmainimage

Kate from learnandgrowbooks.com

Kate is the founder of Learn and Grow Books, which is a website for parents and teachers of pre-K children.

Mexican Wedding Cookies

Mexican Wedding Cookies

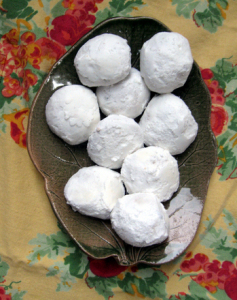
As can be guessed from the name of these scrumptious treats, they are a necessary component of any Mexican wedding or special occasion! Lots of flavor is extracted from just a few simple ingredients in this traditional “biscochito” recipe, said to have originated in Europe and been brought to Mexico via Spain. This tasty activity provides a fantastic opportunity to teach your little one about international foods!

Vary this recipe by choosing your family’s favorite type of nut. Some recipes use pecans, while others use hazelnuts, walnuts, or pralines.

Yield: about 2 dozen cookies.

What You Need:

  • 8 ounces butter
  • 1/2 cup powdered sugar
  • 1 tablespoon vanilla
  • 1/2 teaspoon salt
  • 1 cup very finely chopped almonds (or nut of your choice)
  • 2 1/2 cups sifted all-purpose flour
  • Powdered sugar for dusting

What You Do:

  1. Preheat oven to 350° F.
  2. Beat the butter and powdered sugar until light and fluffy, about 10 – 15 minutes.
  3. Have your child add vanilla, salt, and almonds.
  4. Once thoroughly beaten, remove from the mixer and stir in flour. Do not over mix! The dough should be fairly coarse.
  5. After showing him an example, ask your child to form the dough into small football shapes.
  6. Have your child lightly butter a baking sheet.
  7. Ask your child to place the dough-balls onto the baking sheet and bake them for about 10 minutes, or until they begin to turn golden brown on the bottoms.
  8. When you see the slightest bit of color, make sure to remove the cookies from the oven and place them on a cooling rack.
  9. While the cookies are still warm, place them in a small bowl with powdered sugar and toss them gently until fully coated. When the cookies are cool, they are ready to be served!
mexican-wedding-cookies-slide

Kate from learnandgrowbooks.com

Kate is the founder of Learn and Grow Books, which is a website for parents and teachers of pre-K children.
Apple Barley Pudding

Apple Barley Pudding

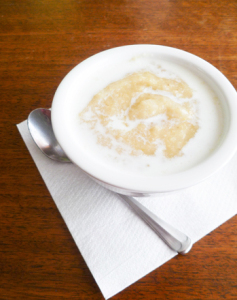
Your child can learn more about traditional Irish cooking this St. Patrick’s Day by making some apple barley pudding – a real tasty treat! Traditional Irish foods are full of flavor and basic ingredients. Along with learning more about Ireland and traditional foods, your child will hone her cooking skills!

What You Need:

  • 4 tablespoons barley
  • 2 cups water
  • 3 large apples
  • 2 tablespoons cream
  • Small saucepan
  • Paring knife
  • Wooden spoon
  • Blender

What You Do:

  1. Invite your child to measure the water for boiling the barley. She can put the water in a small saucepan and bring it to a boil over medium heat.
  2. Once the water is boiling, she can measure and add the barley slowly. Allow the mixture to simmer for about 10 minutes.
  3. Now your child can carefully peel and core the apples. Then she can cut them into one-inch cubes, add them to the boiling barley and give a stir with the wooden spoon.
  4. Invite your child to set the kitchen timer for 10 minutes and let everything simmer, giving things a gentle stir every couple of minutes.
  5. Once the water has been absorbed and the barley is soft, your child can turn off the heat and let the barley mixture cool for about 5 minutes.
  6. Now your child can place the warm barley and apples in blender and securely cover. Invite her to pulse the mixture on low until it forms a thick pudding mixture. She can add a couple of drops of water if things are too thick!
  7. Invite your child to scoop the mixture into a serving bowl and drizzle with 2 tablespoons of cream. She can spice up the pudding with her favorite flavor, such as a sprinkle of cinnamon, drizzle of honey, or splash of vanilla!

Did you know: There are over 150 types of barley cultivated in the United States? Over half of the barley grown is used for grain feed for animals!

apple-barley-pudding-slide

Kate from learnandgrowbooks.com

Kate is the founder of Learn and Grow Books, which is a website for parents and teachers of pre-K children.
Corned Beef and Cabbage

Corned Beef and Cabbage

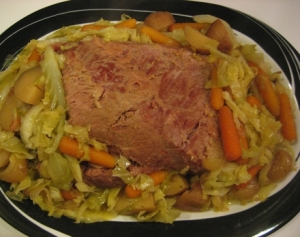
A St. Patrick’s Day staple, corned beef and cabbage is a delicious way to celebrate the holiday and introduce your little one to the kitchen. All of the ingredients can be prepared the night before, making for a painless cooking experience on March 17. He’ll help you put everything into the slow cooker just before heading off to school in the morning, and the entire family will come home to a hot, hearty Irish-inspired meal at dinner time.

What You Need:

  • 4 lb. corned beef
  • 6-quart or larger slow cooker
  • Slow cooker liner (optional but highly recommended)
  • 12 boiling onions, trimmed and peeled
  • 2 cups baby carrots
  • 8-10 baby potatoes, quartered
  • 1 small head green cabbage
  • 2 bay leaves
  • 2 allspice berries
  • 2 whole cloves
  • 2 teaspoons mustard seeds
  • 1 teaspoon dill seeds
  • 1/4 teaspoon cinnamon
  • 4 tablespoons apple juice

What You Do:

  1. Have your child place the corned beef into the slow cooker. Using a slow cooker liner makes cleanup a breeze; if using one, insert it into the cooker ahead of time.
  2. Add the baby carrots, potatoes, and onions to the slow cooker.
  3. If you prefer to use the seasoning packet that comes with the corned beef, that’s fine. But if you want to use your own seasonings, have him toss in the bay leaves, allspice berries, whole cloves, mustard seeds, dill seeds, and cinnamon.
  4. Fill the slow cooker with just enough cold water to cover the corned beef.
  5. Ask him to add the apple juice, and cover the slow cooker. Cook on low for approximately 10 hours.
  6. When there is an hour and 15 minutes of cooking left, have him help you shred the cabbage and add it to the slow cooker. Continue cooking until the meat is tender when a fork is inserted into it.
  7. Remove the bay leaves, cloves, and allspice berries before serving.
  8. Serve piping hot. It’s delicious over rice, or served alongside potatoes.

Note: If your family finds corned beef too salty, rinse it and put it into a pot covered with water and bring to a boil. Discard the water, and then continue with the above corned beef recipe.

 slow-cooked-corn-beef-cabbage-slide

Kate from learnandgrowbooks.com

Kate is the founder of Learn and Grow Books, which is a website for parents and teachers of pre-K children.
How to Roast Beets

How to Roast Beets

Step 1 of 6

Start With Fresh, Firm Beets

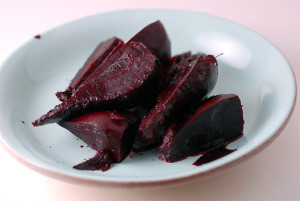
Roasting beets intensifies their flavor, brings out their earthy sweetness, and makes their peels as easy to peel off as an over sized sweater. Roasted beets are particularly delicious in beet salads.

Start with beets that are firm and feel heavy for their size. If the beets came with their greens still attached as pictured above, cut off the greens, wash them.

Rinse any dirt or debris from the beets—some beets may need to be scrubbed clean—and put the beets on a large piece of aluminum foil and preheat the oven to 375°F.

Note: Beets are fairly flexible veggies, if you have something else in the oven at anywhere between 325°F and 425°F, beets will happily roast up at that temperature alongside what you’re already cooking, it just will take a bit longer at lower temperatures.

Step 2 of 6

Drizzle Beets With Oil Before Roasting

Drizzle the beets with a bit of oil before roasting. I like to use olive oil, but grape seed oil or canola oil work just fine, too. Sprinkle the beets with salt, too, if you like.

Note: If you’re planning on making a salad with the roasted beets, feel free to use plenty of oil here—you can use the beet-infused oil in the dressing.

Step 3 of 6

Make a Foil Packet for Roasting Beets

For an even roasting of the beets, fold the foil over them and crimp the sides closed. This helps keep them moist, it also helps contain the powerfully staining juices they’ll emit while roasting and make clean-up a snap.

Roast beets until tender. The amount of time this will take can vary greatly depending on the size of the beets, how many there are, if other things are in the oven, and how fresh the beets are (fresher beets cook up faster). For smaller beets, start checking them for tenderness at about 25 minutes. Larger and older beets can take up to an hour.

Step 4 of 6

Let Beets Cool

Remove the beets from oven when tender (you should be able to easily pierce them with a fork). Open up the foil packet and let them sit until cool enough to handle.

Step 5 of 6

Peel Roasted Beets

When the beets are cool enough to handle, slip their peels off. You can use a paring knife, if you like, but you can also marvel at how easily the peels come off with just a rub of your fingers.

Step 6 of 6

Roasted Beets, Ready to Serve or Use

Serve peeled roasted beets as-is, with a drizzle of olive oil and a sprinkle of salt. Or slice and use them in salads. Roasted beets are particularly tasty with highly flavorful but creamy white cheeses – feta and goat cheese are excellent choices. They also pair well with roasted nuts like walnuts or hazelnuts, as well as fresh herbs like dill and parsley.

I’m always delighted with how well beets work with other sweet fruits and vegetables, particularly oranges, peaches, and tomatoes, which all share a tang within their sweetness that sets off beets quite nicely.

roasted-beets-


Kate from learnandgrowbooks.com

Kate is the founder of Learn and Grow Books, which is a website for parents and teachers of pre-K children.
Dessert Pizza

Dessert Pizza

Looking for a healthy alternative for your preschoolers next birthday bonanza? Try out this surprisingly nutritious and wonderfully delicious dessert pizza!

What You Need:

  • Pound cake
  • Butter knife
  • White frosting
  • Various fruits
  • Small candies and toppings
  • Spatula

What You Do:

  1. Pull out your store-bought pound cake.
  2. With a butter knife, carefully cut out simple pizza topping shapes. (These can be as simple as pepperoni and olives or as elaborate as mushrooms and sliced bell peppers).
  3. Leaving said pizza impressions in the cake, find similar-looking fruit choices to match the molds.
  4. Sculpt your fruit choices accordingly if they do not properly fit their intended molds. (Examples of fruit to pizza topping molds you can use for this activity: banana slices for your pepperoni, grapes or blueberries for green and black olives, orange slices for tomato slices, etc.).
  5. Once sculpted, pair each fruit choice up into different stations with one or two less healthy cake topping choices. (Unhealthy cake topping choices can include hard candies, chocolate, sprinkles, marshmallows, cookies, etc.).
  6. Ensure that your unhealthy cake topping choices do NOT fit any of the molds on the cake.
  7. Once ready, pair your children up into two different teams.
  8. Place one child at each station and have them race to fill in their pizza molds. (To up the difficulty of this activity, assign different topping molds for each team to fill in).
  9. Upon completion of this relay race, allow the winners of the race to choose their slices of cake first.
  10. As soon as cake has been handed out to each child, allow them to finish decorating their cake slices with white or vanilla frosting (whichever you have on hand).
  11. Adults, be sure to help the children with this part of the activity if they are using knives to frost their cake pieces instead of rubber spatulas.
  12. Allow your children to dig in and enjoy a healthy fruit cake they made themselves as soon as their personalized pizza desserts are complete.

file_621353

Kate from learnandgrowbooks.com

Kate is the founder of Learn and Grow Books, which is a website for parents and teachers of pre-K children.
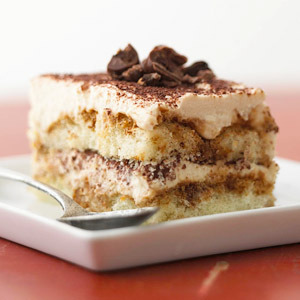
Double Chocolate Tiramisu

Double Chocolate Tiramisu

I will be making this for my Christmas dessert.

Chocolate fans will cheer this twist on tiramisu: It has ladyfingers infused with cocoa instead of espresso and an ethereal filling of chocolate and cream cheese. One bite and you’ll be transported to your favorite trattoria.


  • Prep:
  • Total Time:
  • Servings: 10

Ingredients

  • 2 tablespoons unsweetened cocoa powder, plus more for garnish
  • 1 1/2 cups heavy cream
  • 4 ounces semisweet chocolate, chopped
  • 1 bar (8 ounces) cream cheese, room temperature
  • 3/4 cup sugar
  • 24 ladyfinger cookies (from a 7-ounce package)

Directions

  1. In a medium bowl, mix cocoa powder with 1 1/2 cups very hot water until dissolved; set cocoa mixture aside. In a small microwave-safe bowl, place 1/4 cup cream and chocolate; microwave in 1-minute increments, and stir until melted. Cool to room temperature.

  2. Transfer cooled chocolate mixture to a mixing bowl; add cream cheese and sugar. Using an electric mixer, beat until blended. Add remaining cream; beat chocolate filling until fluffy, about 2 minutes.

  3. Spread 1 cup chocolate filling in the bottom of a 2-quart serving dish. One at a time, dip 6 ladyfingers in cocoa mixture, then arrange in a single layer in dish; spread with 1 cup chocolate filling. Repeat with three more layers, ending with filling.

  4. Cover tiramisu, and refrigerate at least 2 hours (or up to 2 days). Dust with cocoa powder before serving.


A tasty kid-friendly version of tiramisu! I used mascarpone cheese because I prefer it.
I can easily find ladyfinger cookies in the cookie section of any grocery store, but you could also try an Italian bakery or deli, they usually carry tiramisu ingredients including ladyfingers.
If you want to add coffee liquor, you could add it to the cream cheese mixture but this might make it runny, I’d put it in the cocoa water and soak the ladyfingers in the liquor mixture.

Double Chocolate Tiramisu

Kate from learnandgrowbooks.com

Kate is the founder of Learn and Grow Books, which is a website for parents and teachers of pre-K children.
Chocolate-Covered Apples

Chocolate-Covered Apples

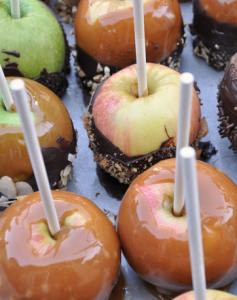
If you love the idea of handing out holiday tins of homemade cookies but your baking skills are non-existent, gourmet caramel chocolate-covered apples are the perfect solution. They’re so easy to make that your child will barely need help, but the results are delicious and look beautiful.

What You Need:

  • Apples
  • Lollipop sticks (available at crafts stores)
  • Bag of caramels (or substitute peanut butter and skip Step 2)
  • Chocolate chips
  • White chocolate
  • Rimmed baking sheet
  • Tin foil
  • Cooking spray
  • Your choice of toppings: crushed nuts, dried coconut, colored holiday sprinkles
  • Clear baker’s wrap and ribbons

What You Do:

  1. Line the baking sheet with tin foil and spray lightly with oil.
  2. Unwrap the caramels and melt according to the directions on the bag.
  3. Dip the entire apple in the caramel, spreading with a knife if it’s too thick to coat evenly. Set aside on baking sheet to cool and harden.
  4. Melt chocolate chips in a microwave-safe bowl, stirring every 15 seconds until thoroughly melted.
  5. Dip the bottom 3/4 of the apple in the chocolate and set back on baking sheet.
  6. Let cool, then drizzle with melted white chocolate.
  7. While chocolate is still soft, dip bottom of apple in your choice of toppings.
  8. Let cool thoroughly, then wrap and give!


chocolate-covered-apples-slide

Kate from learnandgrowbooks.com

Kate is the founder of Learn and Grow Books, which is a website for parents and teachers of pre-K children.
Apple Cider Recipe

Apple Cider Recipe

This apple cider recipe makes a perfect drink for a cold winter day. Freshly brewed apple cider is a perennial favorite for the winter holidays, and it’s one beverage that will please both kids and adults. Preparing this concoction is a process your child will genuinely enjoy and learn from as well! As he helps you prepare this delectable winter treat, he will learn crucial cooking skills, such as measuring, knife safety, and how to follow recipe directions.

The best cider is made by brewing it all day in a crock pot, but if you’re short on time or you don’t own a slow cooker, you can use a pot and simmer it on the stove, on low, for a few hours. Make our apple cider recipe with your child this holiday season.

What You Need:

  • 1 gallon apple juice
  • 1 cinnamon stick
  • 2 teaspoons fresh chopped ginger
  • 3 orange slices
  • 1 lemon
  • 1 tsp whole cloves
  • 1 tsp powdered nutmeg

What You Do:

  1. Have you child use a spoon to peel the ginger before you chop it, using the edge of the spoon to cut into the peel. This method takes less skin off than using a regular potato peeler.
  2. Chop or slice the ginger into small pieces. The longer you plan to cook the cider, the larger the slices can be because they will boil down.
  3. Ask your child the orange and lemon so you can slice it up. You will want to float the slices in the cider as it cooks, and you can eat the rest of the fresh fruit or save it for other recipes.
  4. Have you child pour the juice into the pot or slow cooker. Add the sliced ginger, orange, and lemon.
  5. Invite your child to measure out the remaining ingredients and add the cinnamon stick, cloves, and nutmeg. Help him stir the concoction, cover the pot, and set the heat on low.
  6. If you’re using a slow cooker, you can simply leave the apple cider to brew overnight for approximately eight hours. If you want the cider to be done faster, set the cooker on high and cook for only four hours. On the stove, you will have to monitor the cider so that it’s simmering on low but does not boil, and you can leave it for between two to four hours.
  7. When it’s done, ask your child to choose to either strain the extra ingredients or leave them in the pot as a garnish. Ladle the cider into warmed mugs, and serve it up to guests piping hot!

For variations on the recipe, add any of the following:

  • Cardamom for a richer, spicier taste
  • Black pepper for a surprising kick
  • Maple syrup or honey for extra sweetness

make-fresh-apple-cider-bigthumb

Kate from learnandgrowbooks.com

Kate is the founder of Learn and Grow Books, which is a website for parents and teachers of pre-K children.
4 Guest-Friendly Make-Ahead Breakfasts

4 Guest-Friendly Make-Ahead Breakfasts

Serve up something great for a hungry crew without having to wake up at the crack of dawn.

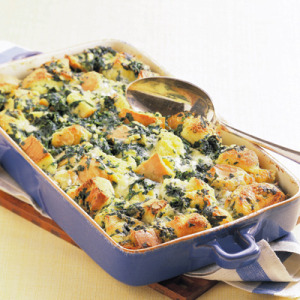
Spinach and Jack Cheese Bread Pudding

Cheese and veggie-filled bread pudding satisfies any big appetite. Just pair with some poached eggs and a fruit salad to round it out.

A delicious departure from quiche, this savory bread pudding is easier to prepare and very satisfying.

Total Time: 30 min

Oven Temp: 350

Ingredients

  • 6 large eggs
  • 2 cup(s) (1%) low-fat milk
  • 1/4 teaspoon(s) dried thyme
  • 1/4 teaspoon(s) salt
  • 1/4 teaspoon(s) coarsely ground pepper
  • 1 pinch(s) ground nutmeg
  • 1 package(s) (10 ounces) frozen chopped spinach, thawed and squeezed dry
  • 1 cup(s) (4 ounces) shredded Monterey Jack cheese
  • 8 slice(s) firm white bread, cut into 3⁄4-inch pieces

Directions

  1. Preheat oven to 375 degrees F. In large bowl, with wire whisk or fork, beat eggs, milk, thyme, salt, pepper, and nutmeg until blended. With rubber spatula, stir in spinach, Monterey Jack, and bread.
  2. Pour mixture into 13-inch by 9-inch ceramic or glass baking dish. Bake bread pudding 20 to 25 minutes or until browned and puffed and knife inserted in center comes out clean.
  3. Remove bread pudding from oven; let stand 5 minutes before serving.

Tips & Techniques

For a Mexican-style variation, replace Monterey Jack with pepper Jack cheese and add 4 ounces sliced pepperoni. Serve with salsa.

spinach-cheese-bread-pudding-lgn

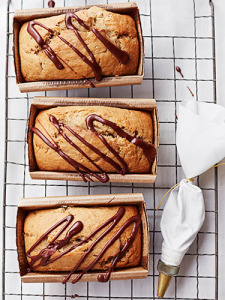
Chocolate-Glazed Banana Bread Minis

Mini loaves ensure that every sweet-loving guest can grab a bite.

Bake breads in mini paper or foil pans — perfect bake sale packaging!

Yields: 6 loaves

Total Time: 45 min

Prep Time: 15 min

Oven Temp: 350

Ingredients

  • 2 cup(s) all-purpose flour
  • 3/4 teaspoon(s) baking soda
  • 1/4 teaspoon(s) salt
  • 2 cup(s) mashed very ripe bananas
  • 2 teaspoon(s) vanilla extract
  • 1/2 cup(s) (1 stick) butter, softened
  • 1/2 cup(s) granulated sugar
  • 1/2 cup(s) packed light brown sugar
  • 2 large eggs
  • 2 ounce(s) semisweet chocolate

Directions

  1. Preheat oven to 350 degrees F.
  2. In medium bowl, whisk flour, baking soda, and salt. In another medium bowl, mix bananas and vanilla.
  3. In bowl, with mixer on medium speed, beat butter and sugars 3 minutes, or until fluffy. Beat in eggs, 1 at a time. With mixer on low, add flour mixture alternately with banana mixture, starting and ending with flour. Divide among 6 disposable mini (1/4-pound) loaf pans.
  4. Bake breads 30 to 35 minutes or until toothpick inserted in centers comes out clean. Cool in pans on wire rack.
  5. Drizzle with chocolate; let set.

chocolate-glazed-banana-bread-minis-recipe-

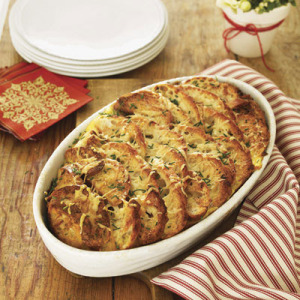
Overnight Savory French Toast

A combination of cheese and chives transforms French toast into a savory wonder.

This savory, feeds-eight French toast — a cost-effective, cheese-crusted combo of baked bread, eggs, and Gruyère — rests overnight so you can sleep in.

Serves: 8

Yields: 8 main-dish servings

Ingredients

  • 6 large eggs
  • 2 cup(s) milk
  • 1 tablespoon(s) Dijon mustard
  • Salt and pepper
  • 1/4 cup(s) snipped chives, plus additional for garnish
  • 1 loaf(s) (9 ounces) French bread (preferably day-old; see Shopping Tip), cut into 1/4-inch-thick slices
  • 6 ounce(s) Gruyère cheese, shredded

Directions

  1. Grease shallow 1 1/2-quart ceramic baking dish. In medium bowl, whisk eggs, milk, Dijon, 1/4 teaspoon salt, and 1/4 teaspoon freshly ground black pepper until well blended. Stir in chives.
  2. Arrange half of bread in bottom of prepared baking dish, overlapping slices to fit. Pour half of egg mixture over bread and sprinkle with two-thirds of Gruyère. Cover with remaining bread, overlapping slices. Pour remaining egg mixture over bread; gently press down to help bread absorb egg mixture. Sprinkle with remaining one-third of Gruyère. Cover and refrigerate overnight.
  3. Preheat oven to 350°F. Bake 50 to 60 minutes or until puffed and golden and tip of knife inserted in center comes out clean, covering top during last 15 minutes if browning too quickly. Let stand 10 minutes to set custard before serving. Sprinkle with snipped chives.

Tips & Techniques

Shopping Tip: Look for discounted day-old French bread in your market or bakery.

savory-french-toast-recipe-

Pimiento Cheese Make-Ahead Quiche

With a made-in-advance quiche, you won’t have to worry about overcooking the eggs in the morning.

Pimiento cheese is a classic Southern snack. Here, it’s reinvented, by being used as the creamy, spicy, savory filling for a quick and easy quiche.

Yields: 6 main-dish servings

Total Time: 1 hr 30 min

Prep Time: 25 min

Oven Temp: 375

Ingredients

  • 1 1/4 cup(s) all-purpose flour, plus more for rolling
  • 1/2 teaspoon(s) sugar
  • 1/2 teaspoon(s) salt
  • 6 tablespoon(s) cold vegetable shortening, cut up
  • 3 tablespoon(s) (or up to 5 tablespoons) water
  • 4 large eggs
  • 1 1/4 cup(s) whole milk
  • 1/2 teaspoon(s) salt
  • 2 cup(s) shredded extra-sharp Cheddar cheese
  • 1 jar(s) (4-ounce) chopped pimientos, drained
  • 2 cup(s) green onions, thinly sliced
  • 2 teaspoon(s) hot pepper sauce
  • 1 teaspoon(s) Worcestershire sauce

Directions

  1. Make the crust: Preheat oven to 375 degrees F. In food processor, pulse flour, and 1/2 teaspoon each sugar and salt until combined. Add vegetable shortening; pulse until coarse crumbs form. Sprinkle in 3 to 5 tablespoons water, pulsing between additions until dough is just moist. Pat into disk. Cover with plastic wrap; freeze 30 minutes or refrigerate up to 2 days.
  2. On lightly floured surface, with floured rolling pin, roll dough into 11-inch round. Transfer to 9-inch pie plate. Trim off excess dough. Tuck edge of dough under and pinch to create rim. Crimp to decorate edge. Line dough with parchment paper or foil and fill with pie weights or dried beans. Bake 15 minutes. Remove liner and weights. Bake another 10 to 13 minutes, or until edge is golden and bottom is no longer raw. Cool slightly on wire rack.
  3. Make the custard: Whisk together eggs, milk, and 1/2 teaspoon salt.
  4. Stir Cheddar cheese, chopped pimientos, green onions, hot pepper sauce, and Worcestershire sauce into custard.
  5. Bake in 375 degrees F oven 35 to 45 minutes or until center is just set. Cool 15 minutes. Serve warm or at room temperature.

    Tips & Techniques

    Make Ahead: Bake one (or more) the night before, cover, and refrigerate until morning. Reheat at 350 degrees F for 15 minutes or until warm. Time tip: To save 10 minutes, use a store-bought crust.

     Pimiento -Cheese -make -ahead-quiche-

Kate from learnandgrowbooks.com

Kate is the founder of Learn and Grow Books, which is a website for parents and teachers of pre-K children.