Tips to get organized for the holidays

Tips to get organized for the holidays

The holidays can be hectic and overwhelming at times. However, if you manage your activities and your time properly, you can have a peaceful and enjoyable holiday season. Follow these tips to get and stay organized.

I need to work on begin organize.

Make a holiday task list

Start by creating a master to-do list with everything you need and want to get done over the next several weeks. Use whatever system works for you, whether that’s an on line calendaring program, a voice-activated system on your smart phone or a large wipe-off calendar in your kitchen. Items you might want to include in your holiday task list include:

  • Christmas card list
  • Church events
  • Decorations
  • Gift shopping (budget, wish list, wrapping)
  • Party planning (guest list, menu, etc.)
  • School activities
  • Travel plans

Once you have created a main list of tasks, break each one down into smaller pieces and place deadlines for each piece on your calendar. Give yourself plenty of time in case you run into any snags along the way.

Maintain your focus

Don’t get overwhelmed this holiday season. You don’t have to say yes to every invitation. Maintain your focus and stick to events and activities that are meaningful to you and your family. Enlist the help of your hubby and kids to keep the house as neat and organized as possible. Don’t sweat the small stuff — it really doesn’t matter if you haven’t swept out the pantry or dusted the blinds this week.

Delegate some of the tasks on your to-do list to those who are willing to help. For example, it might be worth it to you to pay the teen who lives up the street $50 to do all your gift wrapping. Also, be sure to take time out for yourself. The holidays aren’t intended to be about a bunch of stress and obligations — you are supposed to enjoy them.

Create a command center

Here are more way to get organized for the holidays.

Organizational expert, fashionista and author of Lists for Life, Rory Tahari offers these helpful tips to get organized this holiday season. Tahari recommends creating a centralized command center in your home to manage all the activities.

  • Choose an area in your home that can be a designated command center. Pick any space that works for you, whether it is a home office or just a small corner in your family kitchen.
  • When it comes to arming your space, less is more. Don’t clutter your area with unnecessary items and instead, opt for fewer items that promote productivity and efficiency.
  • Manage all of your family’s after-school activities, sports games and holiday parties in one centralized calendar. Assign an area for each member of the family so that everyone can take a look back at the calendar for a quick reminder.
  • With all of the coming and going at different times in my family, Tahari and her family often communicate through Post-it® Notes. Leave the kids friendly reminders, create holiday shopping lists and jot down phone messages on Post-it® Notes. They have a set space where they stick their notes. Tahari says the Pebble Collection by Karim is sleek and she loves that it blends in with her home decor.
  • Tahari dislikes loose papers lying around, so she have a filing system for bills, receipts and even the kids’ school work. She assigns Post-it® Pockets for each family member. They stick conveniently to almost any surface and are suitable for any location.
  • Tahari could not live without her scanner. When she’s finished with any paperwork, she scans each document before it can be recycled.


Kate from learnandgrowbooks.com

Kate is the founder of Learn and Grow Books, which is a website for parents and teachers of pre-K children.

10 Reasons You Should Eat Blueberries Every Day

10 Reasons You Should Eat Blueberries Every Day

Life is crazy. Overs scheduled, nerve-racking and harried. And yet we all know that eating healthfully has to be a priority. Fueling your body with the best nature has to offer helps cope with those stresses and feel energetic, nourished and clean on the inside and out.

The good news is that there are shortcuts to getting the job done without cutting corners. Like eating a few handfuls of organic wild blueberries every day. Yep, we mean it! That’s 365 days a year. When you consider the cream of the crop of fresh-food options—accessibility, storage, taste and labor vs. nutritional payoff, absolutely nothing beats these purple little wonders. Here’s why.

1) Wild blueberries may contribute to the fight against your biggest health fears.

It seems like there’s hardly a bodily complaint that blueberries don’t have an answer for. Jam-packed with nutrients, the little globes get their unique purplish hue from anthocyanin, a potent flavonoid antioxidant that may help protect you from serious illness like cardiovascular illness, neurodegenerative disease and cancer.

2) They fight inflammation.

It’s today’s ultimate buzzword—and that’s because chronic inflammation affects so many people in the form of arthritis (and related joint issues), skin problems, metabolic syndrome and possibly even increased risk of the scarier diseases mentioned above. In one recent study, obese rats that ate the human equivalent of two cups of wild blueberries per day for eight weeks experienced a significantly improved inflammatory response.

3) They may help keep you sharp.

Flavonoids act to protect cells all over your body, including neurons, the nerve cells that transmit thoughts, feelings, memories and more. Keeping these crucial players in top shape will keep you on your toes, so to speak. Research shows that a diet containing blueberries or blueberry extract may enhance memory function, balance and coordination.

4) They help you maintain the brightest skin possible.

Organic wild blueberries’ vitamin A and C are necessary for the health of collagen, your skin’s support structure. Eating foods rich in these nutrients may help slow the development of wrinkles, sagging and dark circles. The berries also contain water, which keeps skin hydrated, bouncy and young looking.

5) In terms of antioxidant power, they’re the absolute best.

Maybe you’re thinking, Sure, but all produce contains antioxidants. The truth is that blueberries have more! In study after study, blueberries outrank other powerhouses, like strawberries, cranberries, blackberries and apples, in terms of their total antioxidant activity. And—if you really want to get specific—blueberries that grow in the wild pack at least twice the nutritional value as their cultivated counterparts. In fact, many researchers choose wild blueberries for their studies, since those are known to be so much more potent.

6) They’re tough.

Just because they’re small and cute doesn’t mean they don’t know how to survive. Some of the sweetest, nutritionally rich blueberries out there grow in the Alaskan wild, fighting to thrive in the frigid temperatures. This battle for survival yields a particularly hardy fruit that’s packed with mega doses of antioxidants and medicinal compounds.

7) They’re delicious.

Ultimately, we all know that this is the most important part. Blueberries taste good.

Incorporate them into your cereal, yogurt, smoothie, ice cream, muffin or other, and you’re sure to be upping the delish factor of your meal. One tip: Wild blueberries tend to do better in taste tests than the larger cultivated kind, so buy them when they’re available!

8) They’re all give, no take.

Sure, fruits like pineapple and pomegranate are healthy and tasty. They’re also a pain in the rear. All the peeling and chopping and discarding—you literally have to put muscle into harvesting your breakfast. OK, that labor can be worth it. But compare that to blueberries: All you have to do is rinse and dump into a bowl or gobble them up by the handful. Like candy!

9) You can totally save them for later, they won’t mind.

Blueberries are so tough that preserving them doesn’t hurt their nutritional power. Buy them dried or frozen, or get them fresh and preserve them yourself—they’ll keep for months. Aloha’s Daily Good Greens, a simple dried-powder pack that you can take anywhere, contains plenty of wild blueberry goodness.

10) Your kids will love them.

Monkey see, monkey do—especially when what you’re doing is eating something sweet, delicious and toddler-sized! Think of the wonders all those healthy antioxidants can do for your child’s young, developing body and mind. Snack time: solved.
Kate from learnandgrowbooks.com

Kate is the founder of Learn and Grow Books, which is a website for parents and teachers of pre-K children.
Homemade Hand Sanitizer

Homemade Hand Sanitizer

With new diseases appearing each day, it’s important to keep your child’s hands clean and germ free. As a parent, you want to do everything possible to ensure your child stays healthy, especially when a contagious virus spreads. Instead of stocking up on hand sanitizer at the store, try this activity where you’ll make your very own personal sanitizer! It’s easy enough for your child to help you with, which means she’ll be more willing to use it and remain healthy.

What You Need:

  • ⅓ cup of rubbing alcohol
  • ⅔ cup of aloe vera gel
  • 8–10 drops of essential oil (such as vanilla, lavender, grapefruit, peppermint, etc.)
  • One small mixing bowl and spoon
  • Recycled liquid soap bottle
  • Funnel

What You Do:

  1. Pick out a scented essential oil with your child. Essential oils can usually be found at health, beauty product, or aromatherapy stores.
  2. Help your child measure out each ingredient and pour them into the mixing bowl. Hand her a spoon and invite her to stir carefully.
  3. Put the funnel in the opening of the soap bottle and pour the mixed ingredients into it.
  4. Screw the pump back on.

Now you’re ready to battle those germs with your own fragrant hand sanitizer!

Besides the concerns already mentioned, alcohol is drying to the skin. To make a healthier and safer product, use 1/4 cup witch hazel instead. This herbal liquid extract can be found at drugstores or health food stores. Then to boost the germ-fighting power, choose an antibacterial essential oil such as tea tree, thyme, lavender, or citrus.


Kate from learnandgrowbooks.com

Kate is the founder of Learn and Grow Books, which is a website for parents and teachers of pre-K children.

4 Guest-Friendly Make-Ahead Breakfasts

4 Guest-Friendly Make-Ahead Breakfasts

Serve up something great for a hungry crew without having to wake up at the crack of dawn.

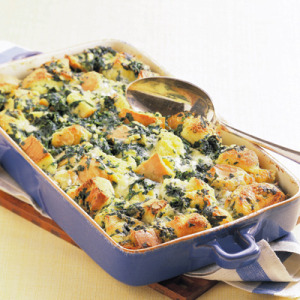
Spinach and Jack Cheese Bread Pudding

Cheese and veggie-filled bread pudding satisfies any big appetite. Just pair with some poached eggs and a fruit salad to round it out.

A delicious departure from quiche, this savory bread pudding is easier to prepare and very satisfying.

Total Time: 30 min

Oven Temp: 350

Ingredients

  • 6 large eggs
  • 2 cup(s) (1%) low-fat milk
  • 1/4 teaspoon(s) dried thyme
  • 1/4 teaspoon(s) salt
  • 1/4 teaspoon(s) coarsely ground pepper
  • 1 pinch(s) ground nutmeg
  • 1 package(s) (10 ounces) frozen chopped spinach, thawed and squeezed dry
  • 1 cup(s) (4 ounces) shredded Monterey Jack cheese
  • 8 slice(s) firm white bread, cut into 3⁄4-inch pieces

Directions

  1. Preheat oven to 375 degrees F. In large bowl, with wire whisk or fork, beat eggs, milk, thyme, salt, pepper, and nutmeg until blended. With rubber spatula, stir in spinach, Monterey Jack, and bread.
  2. Pour mixture into 13-inch by 9-inch ceramic or glass baking dish. Bake bread pudding 20 to 25 minutes or until browned and puffed and knife inserted in center comes out clean.
  3. Remove bread pudding from oven; let stand 5 minutes before serving.

Tips & Techniques

For a Mexican-style variation, replace Monterey Jack with pepper Jack cheese and add 4 ounces sliced pepperoni. Serve with salsa.

spinach-cheese-bread-pudding-lgn

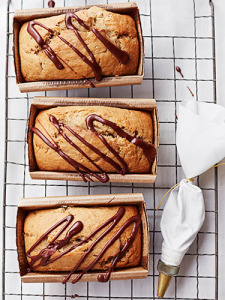
Chocolate-Glazed Banana Bread Minis

Mini loaves ensure that every sweet-loving guest can grab a bite.

Bake breads in mini paper or foil pans — perfect bake sale packaging!

Yields: 6 loaves

Total Time: 45 min

Prep Time: 15 min

Oven Temp: 350

Ingredients

  • 2 cup(s) all-purpose flour
  • 3/4 teaspoon(s) baking soda
  • 1/4 teaspoon(s) salt
  • 2 cup(s) mashed very ripe bananas
  • 2 teaspoon(s) vanilla extract
  • 1/2 cup(s) (1 stick) butter, softened
  • 1/2 cup(s) granulated sugar
  • 1/2 cup(s) packed light brown sugar
  • 2 large eggs
  • 2 ounce(s) semisweet chocolate

Directions

  1. Preheat oven to 350 degrees F.
  2. In medium bowl, whisk flour, baking soda, and salt. In another medium bowl, mix bananas and vanilla.
  3. In bowl, with mixer on medium speed, beat butter and sugars 3 minutes, or until fluffy. Beat in eggs, 1 at a time. With mixer on low, add flour mixture alternately with banana mixture, starting and ending with flour. Divide among 6 disposable mini (1/4-pound) loaf pans.
  4. Bake breads 30 to 35 minutes or until toothpick inserted in centers comes out clean. Cool in pans on wire rack.
  5. Drizzle with chocolate; let set.

chocolate-glazed-banana-bread-minis-recipe-

Overnight Savory French Toast

A combination of cheese and chives transforms French toast into a savory wonder.

This savory, feeds-eight French toast — a cost-effective, cheese-crusted combo of baked bread, eggs, and Gruyère — rests overnight so you can sleep in.

Serves: 8

Yields: 8 main-dish servings

Ingredients

  • 6 large eggs
  • 2 cup(s) milk
  • 1 tablespoon(s) Dijon mustard
  • Salt and pepper
  • 1/4 cup(s) snipped chives, plus additional for garnish
  • 1 loaf(s) (9 ounces) French bread (preferably day-old; see Shopping Tip), cut into 1/4-inch-thick slices
  • 6 ounce(s) Gruyère cheese, shredded

Directions

  1. Grease shallow 1 1/2-quart ceramic baking dish. In medium bowl, whisk eggs, milk, Dijon, 1/4 teaspoon salt, and 1/4 teaspoon freshly ground black pepper until well blended. Stir in chives.
  2. Arrange half of bread in bottom of prepared baking dish, overlapping slices to fit. Pour half of egg mixture over bread and sprinkle with two-thirds of Gruyère. Cover with remaining bread, overlapping slices. Pour remaining egg mixture over bread; gently press down to help bread absorb egg mixture. Sprinkle with remaining one-third of Gruyère. Cover and refrigerate overnight.
  3. Preheat oven to 350°F. Bake 50 to 60 minutes or until puffed and golden and tip of knife inserted in center comes out clean, covering top during last 15 minutes if browning too quickly. Let stand 10 minutes to set custard before serving. Sprinkle with snipped chives.

Tips & Techniques

Shopping Tip: Look for discounted day-old French bread in your market or bakery.

savory-french-toast-recipe-

Pimiento Cheese Make-Ahead Quiche

With a made-in-advance quiche, you won’t have to worry about overcooking the eggs in the morning.

Pimiento cheese is a classic Southern snack. Here, it’s reinvented, by being used as the creamy, spicy, savory filling for a quick and easy quiche.

Yields: 6 main-dish servings

Total Time: 1 hr 30 min

Prep Time: 25 min

Oven Temp: 375

Ingredients

  • 1 1/4 cup(s) all-purpose flour, plus more for rolling
  • 1/2 teaspoon(s) sugar
  • 1/2 teaspoon(s) salt
  • 6 tablespoon(s) cold vegetable shortening, cut up
  • 3 tablespoon(s) (or up to 5 tablespoons) water
  • 4 large eggs
  • 1 1/4 cup(s) whole milk
  • 1/2 teaspoon(s) salt
  • 2 cup(s) shredded extra-sharp Cheddar cheese
  • 1 jar(s) (4-ounce) chopped pimientos, drained
  • 2 cup(s) green onions, thinly sliced
  • 2 teaspoon(s) hot pepper sauce
  • 1 teaspoon(s) Worcestershire sauce

Directions

  1. Make the crust: Preheat oven to 375 degrees F. In food processor, pulse flour, and 1/2 teaspoon each sugar and salt until combined. Add vegetable shortening; pulse until coarse crumbs form. Sprinkle in 3 to 5 tablespoons water, pulsing between additions until dough is just moist. Pat into disk. Cover with plastic wrap; freeze 30 minutes or refrigerate up to 2 days.
  2. On lightly floured surface, with floured rolling pin, roll dough into 11-inch round. Transfer to 9-inch pie plate. Trim off excess dough. Tuck edge of dough under and pinch to create rim. Crimp to decorate edge. Line dough with parchment paper or foil and fill with pie weights or dried beans. Bake 15 minutes. Remove liner and weights. Bake another 10 to 13 minutes, or until edge is golden and bottom is no longer raw. Cool slightly on wire rack.
  3. Make the custard: Whisk together eggs, milk, and 1/2 teaspoon salt.
  4. Stir Cheddar cheese, chopped pimientos, green onions, hot pepper sauce, and Worcestershire sauce into custard.
  5. Bake in 375 degrees F oven 35 to 45 minutes or until center is just set. Cool 15 minutes. Serve warm or at room temperature.

    Tips & Techniques

    Make Ahead: Bake one (or more) the night before, cover, and refrigerate until morning. Reheat at 350 degrees F for 15 minutes or until warm. Time tip: To save 10 minutes, use a store-bought crust.

     Pimiento -Cheese -make -ahead-quiche-

Kate from learnandgrowbooks.com

Kate is the founder of Learn and Grow Books, which is a website for parents and teachers of pre-K children.

Homemade Dog Treats

Homemade Dog Treats

Homemade dog treats are fun to make and delicious for your household pet! If your dog feels left out of the family’s festive holiday baking, make a batch of tasty homemade dog treats to appease him. These homemade dog treats are simple for your child to make, and the cooking process provides a good lesson on fractions and measurements as well. These homemade dog treats make excellent Christmas gifts for dogs, so go ahead and make a whole batch for your furry friend and his neighborhood companions. These homemade dog treats are made using only ordinary kitchen ingredients, and they are even edible for humans!

What You Need:

  • 1 cup whole wheat flour
  • 1 cup all-purpose flour
  • 1/2 cup powdered milk
  • 1/2 cup wheat germ
  • 1 large egg, slightly beaten
  • 6 tbsp. Crisco
  • 1/2 cup warm water
  • 1/4 cup flaxseed (optional, but healthy!)

What You Do:

  1. Show your child how to preheat the oven to 325° F.
  2. Have your child combine all the dry ingredients in a large bowl.
  3. Cut in the Crisco; help your child add in the egg and water to the mixture.
  4. Ask your child to stir in the flaxseed, if you are including it.
  5. Invite your child to roll out the dough onto a lightly floured surface until it reaches about 1/2-inch thickness. Have him use cookie cutters in his favorite holiday shapes to cut up the dough.
  6. Bake the biscuits for approximately 30 minutes, or until golden brown.

Kate from learnandgrowbooks.com

Kate is the founder of Learn and Grow Books, which is a website for parents and teachers of pre-K children.

10 Uses for Coffee Grounds

10 Uses for Coffee Grounds

Stash the leftovers from your morning pot of joe for these clever household uses

What this Brew Leftover Can Do

Once you’ve brewed your morning cup of joe, perk up around-the-house tasks with this surprisingly versatile leftover

1. Deodorize Your Fridge

Place a bowl of dry grounds in your refrigerator or freezer to neutralize odors left by stale or spoiled food.

2. Clean Tools and Dishware

Place a few teaspoons of grounds on a thin cleaning rag and use to scour away grease and grime. Finish with a thorough rinsing.

3. Hide Furniture Scratches

Dip a cotton swab into steeped grounds and dab on scratches in dark wood furniture to minimize them. Just test in an inconspicuous area first.

4. Give Paper an Antique Look

Dip paper or sheets of stationery in a soupy mix of grounds and water; allow them to sit a minute or two, then let dry and brush off the grounds.

5. Repel Insects

Mound grounds into a ring to create a protective border around plants that will ward off ants and slugs.

6. Grow Blue Hydrangeas

Work grounds into the soil at the base of mophead hydrangeas to increase the acidity level. This helps the shrubs absorb aluminum, which you can add to the soil to keep the flowers a vibrant blue.

7. Contain Ashes

Sprinkle damp grounds on fireplace ashes to cut down on airborne dust as you sweep them up.

8. Scrub Hands

Rub a scoop of grounds between palms as an exfoliant to remove dead skin and help eliminate smells from foods like fish and garlic.

9. Make a Cockroach Trap

Fill a can or jar with an inch or two of moistened coffee grounds, then line the container’s neck with extra-sticky double-sided tape. The scent will draw the roaches into the trap.

10. Fortify Plants

Give seedlings a nitrogen boost by stirring grounds into soil or a watering can.

 
Kate from learnandgrowbooks.com

Kate is the founder of Learn and Grow Books, which is a website for parents and teachers of pre-K children.

Will Washing Your Hair With Conditioner Work?

Will Washing Your Hair With Conditioner Work?

However, this idea is not new. Clarence Robbins, a well known expert on the science of hair, wrote about the damaging potential of shampoo in his book, Chemical and Physical Behavior of Human Hair, in 1979.

But, there’s an even newer method that’s gaining popularity: washing hair with conditioner. But does it work? Yes…sort of. Conditioners do contain ingredients that have the potential to cleanse hair because of their detergent-like qualities, meaning when combined with water, they can help rinse away dirt and bacteria.

However, these ingredients, which are called cationic surfactants, are positively charged and are therefore attracted to the negative charge carried by the protein in your hair. This means they are more likely to stick to your hair, rather than rinse away. Translation: Conditioner probably won’t rinse gunk out of your hair nearly as well as shampoo, but it might leave your hair feeling nice.

Even knowing this I still had my doubts. I anticipated that my hair wouldn’t feel as clean as it does after my normal regimen, but I was wrong. After washing with conditioner, my hair looks and feels clean, soft, and smooth. I also expected that the conditioner would weigh my hair down, but my locks still had plenty of body and volume.

Interested in trying it out yourself? Here’s how:

1. Pick a no-frills conditioner.
Inexpensive conditioners make better cleansers because they lack the softening ingredients that are packed into costly conditioners. They also typically contain more of those conditioning ingredients that can have cleansing potential.

2. Be prepared to scrub for a while.
After you soak your hair in the shower, put a big pile of the conditioner on the top of your head and start scrubbing it in. Since it won’t create any lather, you really have to work at rubbing the conditioner into your hair. Focus on the roots and hairline where hair tends to be the greasiest. After scrubbing, I applied more conditioner and piled my hair at the top of my head for the rest of my shower.

3. Rinse the conditioner out completely.
For an extra boost, I then applied my regular fancier conditioner to the ends of my hair, and rinsed that out.

A Word of Warning
This trend is not recommended for anyone with very oily or greasy hair, or if you haven’t washed your hair in a few days. Also, if you start using this method, I’d alternate with shampoo every once in awhile for a more stringent cleaning.
Kate from learnandgrowbooks.com

Kate is the founder of Learn and Grow Books, which is a website for parents and teachers of pre-K children.